Spring MVC
SpringBoot 系列文章
Spring MVC 之初体验 环境搭建 在 IDEA 中新建一个 web 项目,用 Maven 管理项目的话,在 pom.xml 中加入 Spring MVC 和 Servlet 依赖即可。
1 2 3 4 5 6 7 8 9 10 11 12 13 <dependency > <groupId > org.springframework</groupId > <artifactId > spring-webmvc</artifactId > <version > 4.3.9.RELEASE</version > </dependency > <dependency > <groupId > javax.servlet</groupId > <artifactId > javax.servlet-api</artifactId > <version > 3.1.0</version > <scope > provided</scope > </dependency >
Spring MVC 简单配置
在 web.xml 中配置 Servlet
创建 Spring MVC 的 xml 配置文件
创建 Controller 和 View
1、web.xml
1 2 3 4 5 6 7 8 9 10 11 12 13 14 15 16 17 18 19 20 21 22 23 24 25 26 27 28 29 30 31 32 33 34 <servlet > <servlet-name > spring</servlet-name > <servlet-class > org.springframework.web.servlet.DispatcherServlet</servlet-class > <load-on-startup > 1</load-on-startup > </servlet > <servlet-mapping > <servlet-name > spring</servlet-name > <url-pattern > *.do</url-pattern > </servlet-mapping > <listener > <listenerclass > org.springframework.web.context.ContextLoaderListener </listener-class > </listener > <context-param > <param-name > contextConfigLocation</param-name > <param-value > classpath:config/applicationContext.xml</param-value > </context-param >
2、spring-servlet.xml
1
2
3
4
5
6
7
8
9
10
11
12
13
14
15
16
17
18
19
20
21
<?xml version="1.0" encoding="UTF-8"?> <beans xmlns ="http://www.springframework.org/schema/beans" xmlns:xsi ="http://www.w3.org/2001/XMLSchema-instance" xmlns:p ="http://www.springframework.org/schema/p" xmlns:context ="http://www.springframework.org/schema/context" xsi:schemaLocation ="http://www.springframework.org/schema/beans http://www.springframework.org/schema/beans/spring-beans-3.0.xsd http://www.springframework.org/schema/aop http://www.springframework.org/schema/aop/spring-aop-3.0.xsd http://www.springframework.org/schema/tx http://www.springframework.org/schema/tx/spring-tx-3.0.xsd http://www.springframework.org/schema/context <a href=" http: //www.springframework.org /schema /context /spring-context-3.0.xsd "></a > "> <context:annotation-config /> <context:component-scan base-package ="controller" > </context:component-scan > <bean class ="org.springframework.web.servlet.mvc.annotation.AnnotationMethodHandlerAdapter" /> <bean class ="org.springframework.web.servlet.view.InternalResourceViewResolver" p:prefix ="/jsp/" p:suffix =".jsp" /> </beans >
3、Controller
1
2
3
4
5
6
7
8
9
10
11
12
13
14
15
16
17
18
19
20
21
22
23
24
25
26
27
28
29
30
31
32
33
34
35
36
37
38
39
40
41
42
43
44
45
46
47
48
49
50
51
52
53
54
55
56
57
58
59
60
61
package controller;import javax.servlet.http.HttpServletRequest;import org.springframework.stereotype.Controller;import org.springframework.web.bind.annotation.RequestMapping;import org.springframework.web.bind.annotation.RequestParam;import entity.User;@Controller public class TestController @RequestMapping ("/test/login.do" ) public String testLogin (@RequestParam(value="username" ) String username, String password, HttpServletRequest request) if (!"admin" .equals(username) || !"admin" .equals(password)) { return "loginError" ; } return "loginSuccess" ; } @RequestMapping ("/test/login2.do" ) public ModelAndView testLogin2 (String username, String password, int age) if (!"admin" .equals(username) || !"admin" .equals(password) || age < 5 ) { return new ModelAndView("loginError" ); } return new ModelAndView(new RedirectView("../index.jsp" )); } @RequestMapping ("/test/login3.do" ) public ModelAndView testLogin3 (User user) String username = user.getUsername(); String password = user.getPassword(); int age = user.getAge(); if (!"admin" .equals(username) || !"admin" .equals(password) || age < 5 ) { return new ModelAndView("loginError" ); } return new ModelAndView("loginSuccess" ); } @Resource (name = "loginService" ) private LoginService loginService; @RequestMapping ("/test/login4.do" ) public String testLogin4 (User user) if (loginService.login(user) == false ) { return "loginError" ; } return "loginSuccess" ; } }
@RequestMapping 可以写在方法上,也可以写在类上,上面代码方法上的 RequestMapping 都含有 /test , 那么我们就可以将其抽出直接写在类上,那么方法里面就不需要写 /test 了。
如下即可:
1
2
3
4
5
6
7
8
9
10
11
12
13
14
15
16
@Controller @RequestMapping ("/test" )public class TestController @RequestMapping ("/login.do" ) public String testLogin (@RequestParam(value="username" ) String username, String password, HttpServletRequest request) if (!"admin" .equals(username) || !"admin" .equals(password)) { return "loginError" ; } return "loginSuccess" ; } }
上面的代码方法的参数中可以看到有一个 @RequestParam 注解,其实还有 @PathVariable 。这两个的区别是啥呢?
@PathVariable 标记在方法的参数上,利用它标记的参数可以利用请求路径传值。@RequestParam是指请求url地址映射中必须含有的参数(除非属性 required=false, 默认为 true)
看如下例子:
1
2
3
4
5
6
7
8
9
10
11
12
@RequestMapping ("/user/{userId}" ) public String userinfo (Model model, @PathVariable("userId" ) int userId, HttpSession session) System.out.println("进入 userinfo 页面" ); User user1 = (User) session.getAttribute("user" ); if (user1 == null ) { return "login" ; } User user = userService.selectUserById(userId); model.addAttribute("user" , user); return "userinfo" ; }
上面例子中如果浏览器请求的是 /user/1 的时候,就表示此时的用户 id 为 1,此时就会先从 session 中查找是否有 “user” 属性,如果有的话,就代表用户此时处于登录的状态,如果没有的话,就会让用户返回到登录页面,这种机制在各种网站经常会使用的,然后根据这个 id = 1 ,去查找用户的信息,然后把查找的 “user” 放在 model 中,然后返回用户详情页面,最后在页面中用 $!{user.name} 获取用户的名字,同样的方式可以获取用户的其他信息,把所有的用户详情信息展示出来。
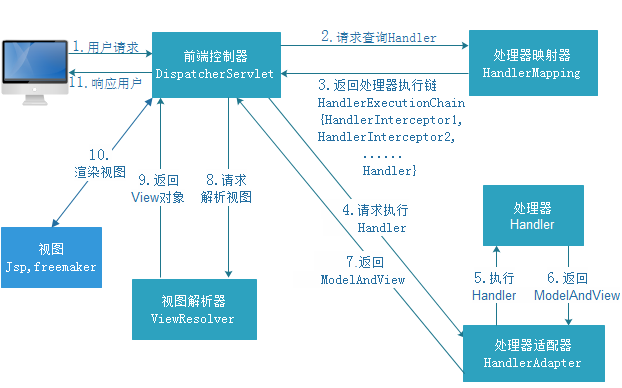
创建 Spring MVC 之器 Spring MVC 核心 Servlet 架构图如下:
Java 中常用的 Servlet 我在另外一篇文章写的很清楚了,有兴趣的请看:通过源码详解 Servlet ,这里我就不再解释了。
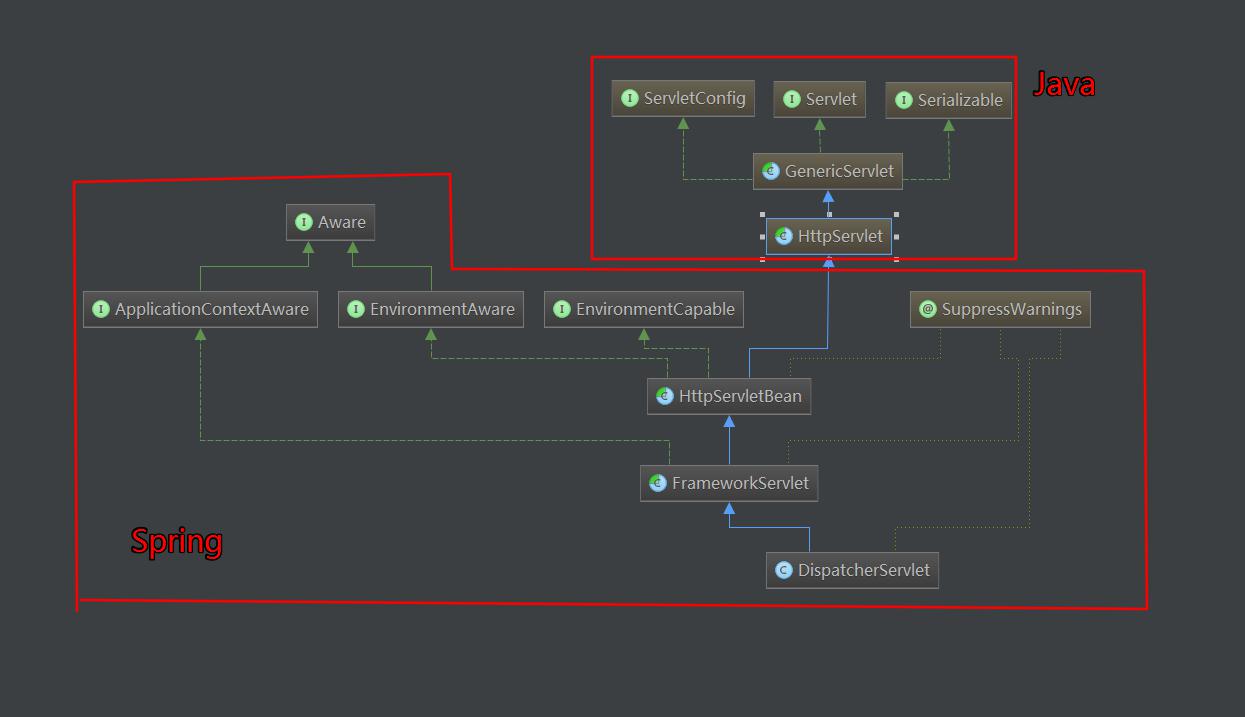
这里主要讲 Spring 中的 HttpServletBean、FrameworkServlet、DispatcherServlet 这三个类的创建过程。
通过上面的图,可以看到这三个类直接实现三个接口:EnvironmentCapable、EnvironmentAware、ApplicationContextAware。下面我们直接看下这三个接口的内部是怎样写的。
EnvironmentCapable.java
1
2
3
4
5
public interface EnvironmentCapable @Nullable Environment getEnvironment () ; }
EnvironmentAware.java
1
2
3
4
public interface EnvironmentAware extends Aware void setEnvironment (Environment environment) }
ApplicationContextAware.java
1
2
3
4
5
public interface ApplicationContextAware extends Aware { //设置运行对象的应用上下文 //当类实现这个接口后,这个类可以获取ApplicationContext中所有的bean,也就是说这个类可以直接获取Spring配置文件中所有有引用到的bean对象 void setApplicationContext(ApplicationContext applicationContext) throws BeansException; }
怎么使用这个这个接口呢?
参考文章:org.springframework.context.ApplicationContextAware使用理解
HttpServletBean
这里就直接看其中最重要的 init() 方法的代码了:
1 2 3 4 5 6 7 8 9 10 11 12 13 14 15 16 17 18 19 20 21 22 23 24 25 26 27 28 29 30 31 32 33 34 @Override public final void init () throws ServletException PropertyValues pvs = new ServletConfigPropertyValues(getServletConfig(), this .requiredProperties); if (!pvs.isEmpty()) { try { BeanWrapper bw = PropertyAccessorFactory.forBeanPropertyAccess(this ); ResourceLoader resourceLoader = new ServletContextResourceLoader(getServletContext()); bw.registerCustomEditor(Resource.class, new ResourceEditor(resourceLoader, getEnvironment())); initBeanWrapper(bw); bw.setPropertyValues(pvs, true ); } catch (BeansException ex) { throw ex; } } initServletBean(); }
FrameworkServlet
其中重要方法如下:里面也就两句关键代码,日志代码我直接删掉了
1
2
3
4
5
6
7
8
9
10
11
12
13
14
15
16
17
18
19
20
21
22
protected final void initServletBean () throws ServletException long startTime = System.currentTimeMillis(); try { this .webApplicationContext = initWebApplicationContext(); initFrameworkServlet(); } catch (ServletException ex) { this .logger.error("Context initialization failed" , ex); throw ex; } catch (RuntimeException ex) { this .logger.error("Context initialization failed" , ex); throw ex; } }
再来看看上面代码中调用的 initWebApplicationContext() 方法
1
2
3
4
5
6
7
8
9
10
11
12
13
14
15
16
17
18
19
20
21
22
23
24
25
26
27
28
29
30
31
32
33
34
35
36
37
38
39
40
41
42
43
44
protected WebApplicationContext initWebApplicationContext () WebApplicationContext rootContext = WebApplicationContextUtils.getWebApplicationContext(getServletContext()); WebApplicationContext wac = null ; if (this .webApplicationContext != null ) { wac = this .webApplicationContext; if (wac instanceof ConfigurableWebApplicationContext) { ConfigurableWebApplicationContext cwac = (ConfigurableWebApplicationContext) wac; if (!cwac.isActive()) { if (cwac.getParent() == null ) { cwac.setParent(rootContext); } configureAndRefreshWebApplicationContext(cwac); } } } if (wac == null ) { wac = findWebApplicationContext(); } if (wac == null ) { wac = createWebApplicationContext(rootContext); } if (!this .refreshEventReceived) { onRefresh(wac); } if (this .publishContext) { String attrName = getServletContextAttributeName(); getServletContext().setAttribute(attrName, wac); if (this .logger.isDebugEnabled()) { this .logger.debug("Published WebApplicationContext of servlet '" + getServletName() + "' as ServletContext attribute with name [" + attrName + "]" ); } } return wac; }
initWebApplicationContext 方法做了三件事:
获取 Spring 的根容器 rootContext
设置 webApplicationContext 并根据情况调用 onRefresh 方法
将 webApplicationContext 设置到 ServletContext 中
这里在讲讲上面代码中的 wac == null 的几种情况:
1)、当 WebApplicationContext 已经存在 ServletContext 中时,通过配置在 servlet 中的 ContextAttribute 参数获取,调用的是 findWebApplicationContext() 方法
1
2
3
4
5
6
7
8
9
10
11
12
protected WebApplicationContext findWebApplicationContext () String attrName = getContextAttribute(); if (attrName == null ) { return null ; } WebApplicationContext wac = WebApplicationContextUtils.getWebApplicationContext(getServletContext(), attrName); if (wac == null ) { throw new IllegalStateException("No WebApplicationContext found: initializer not registered?" ); } return wac; }
2)、如果 WebApplicationContext 还没有创建,调用的是 createWebApplicationContext 方法
1
2
3
4
5
6
7
8
9
10
11
12
13
14
15
16
17
18
19
20
21
22
23
24
25
26
27
28
29
30
31
32
33
34
35
36
37
38
39
40
41
42
43
44
45
46
47
48
49
50
51
52
53
54
55
56
57
58
protected WebApplicationContext createWebApplicationContext (@Nullable ApplicationContext parent) Class<?> contextClass = getContextClass(); if (!ConfigurableWebApplicationContext.class.isAssignableFrom(contextClass)) { throw new ApplicationContextException( "Fatal initialization error in servlet with name '" + getServletName() + "': custom WebApplicationContext class [" + contextClass.getName() + "] is not of type ConfigurableWebApplicationContext" ); } ConfigurableWebApplicationContext wac = (ConfigurableWebApplicationContext) BeanUtils.instantiateClass(contextClass); wac.setEnvironment(getEnvironment()); wac.setParent(parent); wac.setConfigLocation(getContextConfigLocation()); configureAndRefreshWebApplicationContext(wac); return wac; } protected void configureAndRefreshWebApplicationContext (ConfigurableWebApplicationContext wac) if (ObjectUtils.identityToString(wac).equals(wac.getId())) { if (this .contextId != null ) { wac.setId(this .contextId); } else { wac.setId(ConfigurableWebApplicationContext.APPLICATION_CONTEXT_ID_PREFIX + ObjectUtils.getDisplayString(getServletContext().getContextPath()) + '/' + getServletName()); } } wac.setServletContext(getServletContext()); wac.setServletConfig(getServletConfig()); wac.setNamespace(getNamespace()); wac.addApplicationListener(new SourceFilteringListener(wac, new ContextRefreshListener())); ConfigurableEnvironment env = wac.getEnvironment(); if (env instanceof ConfigurableWebEnvironment) { ((ConfigurableWebEnvironment) env).initPropertySources(getServletContext(), getServletConfig()); } postProcessWebApplicationContext(wac); applyInitializers(wac); wac.refresh(); }
里面还有 doXXX() 方法,大家感兴趣的可以去看看。
DispatcherServlet
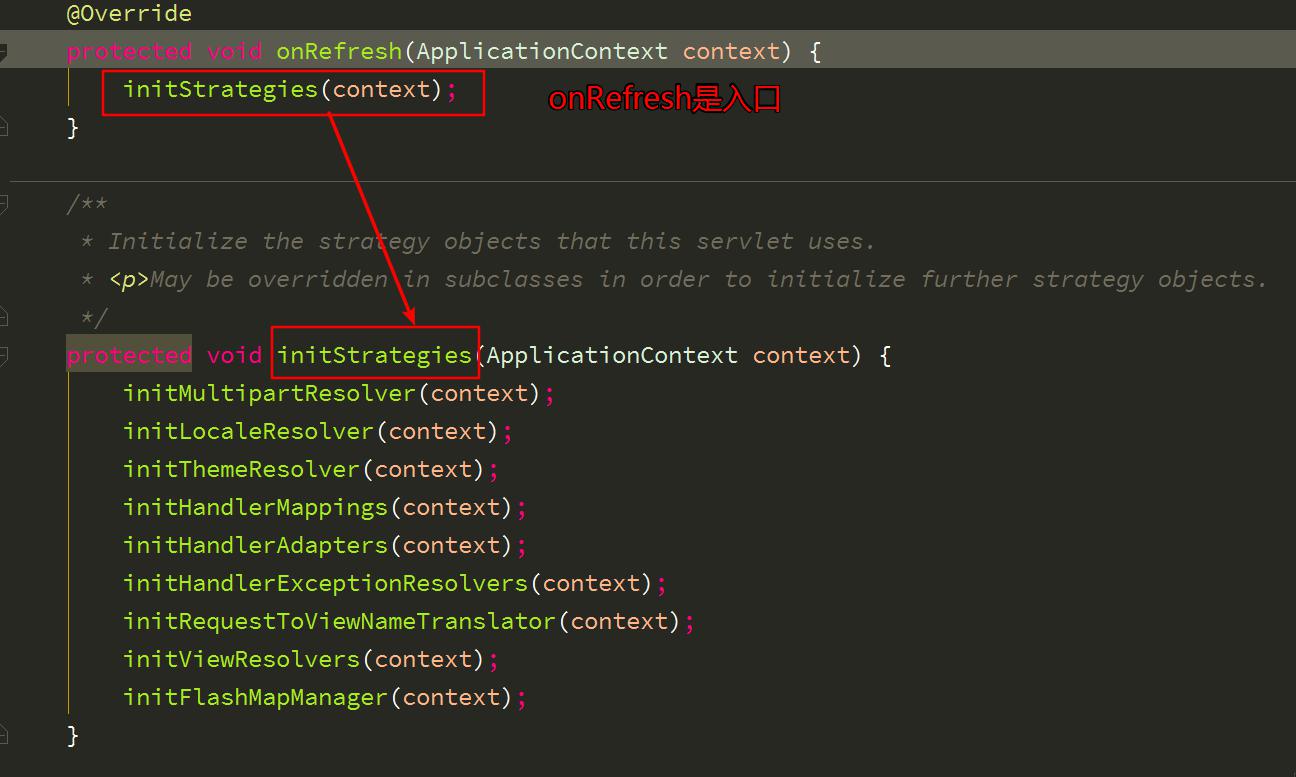
DispatcherServlet 继承自 FrameworkServlet,onRefresh 方法是 DispatcherServlet 的入口方法,在 initStrategies 方法中调用了 9 个初始化的方法。
这里分析其中一个初始化方法:initLocaleResolver() 方法
1
2
3
4
5
6
7
8
9
10
11
12
private void initLocaleResolver (ApplicationContext context) try { this .localeResolver = context.getBean(LOCALE_RESOLVER_BEAN_NAME, LocaleResolver.class); } catch (NoSuchBeanDefinitionException ex) { this .localeResolver = getDefaultStrategy(context, LocaleResolver.class); } }
查看默认策略代码:
1
2
3
4
5
6
7
8
9
10
11
12
13
14
15
16
17
18
19
20
21
22
23
24
25
26
27
28
29
30
31
32
33
34
35
36
37
38
39
40
41
42
43
44
45
46
47
protected <T> T getDefaultStrategy (ApplicationContext context, Class<T> strategyInterface) { List<T> strategies = getDefaultStrategies(context, strategyInterface); if (strategies.size() != 1 ) { throw new BeanInitializationException( "DispatcherServlet needs exactly 1 strategy for interface [" + strategyInterface.getName() + "]" ); } return strategies.get(0 ); } @SuppressWarnings ("unchecked" ) protected <T> List<T> getDefaultStrategies (ApplicationContext context, Class<T> strategyInterface) { String key = strategyInterface.getName(); String value = defaultStrategies.getProperty(key); if (value != null ) { String[] classNames = StringUtils.commaDelimitedListToStringArray(value); List<T> strategies = new ArrayList<>(classNames.length); for (String className : classNames) { try { Class<?> clazz = ClassUtils.forName(className, DispatcherServlet.class.getClassLoader()); Object strategy = createDefaultStrategy(context, clazz); strategies.add((T) strategy); } catch (ClassNotFoundException ex) { throw new BeanInitializationException( "Could not find DispatcherServlet's default strategy class [" + className + "] for interface [" + key + "]" , ex); } catch (LinkageError err) { throw new BeanInitializationException( "Error loading DispatcherServlet's default strategy class [" + className + "] for interface [" + key + "]: problem with class file or dependent class" , err); } } return strategies; } else { return new LinkedList<>(); } }
其他几个方法大概也类似,我就不再写了。
小结 主要讲了 Spring MVC 自身创建过程,分析了 Spring MVC 中 Servlet 的三个层次:HttpServletBean、FrameworkServlet 和 DispatcherServlet。HttpServletBean 继承自 Java 的 HttpServlet,其作用是将配置的参数设置到相应的属性上;FrameworkServlet 初始化了 WebApplicationContext;DispatcherServlet 初始化了自身的 9 个组件。
Spring MVC 之用 分析 Spring MVC 是怎么处理请求的。首先分析 HttpServletBean、FrameworkServlet 和 DispatcherServlet 这三个 Servlet 的处理过程,最后分析 doDispatcher 的结构。
HttpServletBean
参与了创建工作,并没有涉及请求的处理。
FrameworkServlet
在类中的 service() 、doGet()、doPost()、doPut()、doDelete()、doOptions()、doTrace() 这些方法中可以看到都调用了一个共同的方法 processRequest() ,它是类在处理请求中最核心的方法。
1
2
3
4
5
6
7
8
9
10
11
12
13
14
15
16
17
18
19
20
21
22
23
24
25
26
27
28
29
30
31
32
33
34
35
36
37
38
39
40
41
42
protected final void processRequest (HttpServletRequest request, HttpServletResponse response) throws ServletException, IOException { long startTime = System.currentTimeMillis(); Throwable failureCause = null ; LocaleContext previousLocaleContext = LocaleContextHolder.getLocaleContext(); LocaleContext localeContext = buildLocaleContext(request); RequestAttributes previousAttributes = RequestContextHolder.getRequestAttributes(); ServletRequestAttributes requestAttributes = buildRequestAttributes(request, response, previousAttributes); WebAsyncManager asyncManager = WebAsyncUtils.getAsyncManager(request); asyncManager.registerCallableInterceptor(FrameworkServlet.class.getName(), new RequestBindingInterceptor()); initContextHolders(request, localeContext, requestAttributes); try { doService(request, response); }catch (ServletException ex) { failureCause = ex; throw ex; }catch (IOException ex) { failureCause = ex; throw ex; }catch (Throwable ex) { failureCause = ex; throw new NestedServletException("Request processing failed" , ex); }finally { resetContextHolders(request, previousLocaleContext, previousAttributes); if (requestAttributes != null ) { requestAttributes.requestCompleted(); } publishRequestHandledEvent(request, response, startTime, failureCause); } }
DispatcherServlet
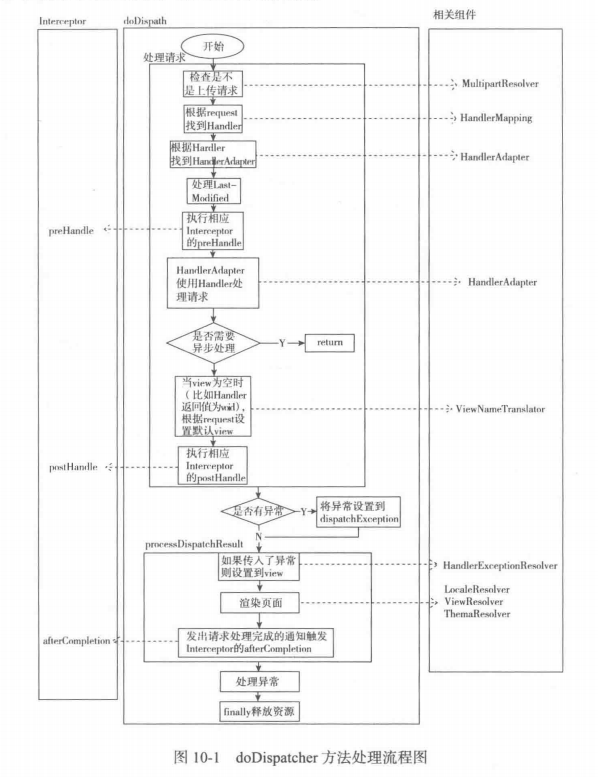
上一章中其实还没把该类讲清楚,在这个类中,里面的智行处理的入口方法应该是 doService 方法,方法里面调用了 doDispatch 进行具体的处理,在调用 doDispatch 方法之前 doService 做了一些事情:首先判断是不是 include 请求,如果是则对 request 的 Attribute 做个快照备份,等 doDispatcher 处理完之后(如果不是异步调用且未完成)进行还原 ,在做完快照后又对 request 设置了一些属性。
1
2
3
4
5
6
7
8
9
10
11
12
13
14
15
16
17
18
19
20
21
22
23
24
25
26
27
28
29
30
31
32
33
34
35
36
37
38
39
protected void doService (HttpServletRequest request, HttpServletResponse response) throws Exception Map<String, Object> attributesSnapshot = null ; if (WebUtils.isIncludeRequest(request)) { attributesSnapshot = new HashMap<>(); Enumeration<?> attrNames = request.getAttributeNames(); while (attrNames.hasMoreElements()) { String attrName = (String) attrNames.nextElement(); if (this .cleanupAfterInclude || attrName.startsWith(DEFAULT_STRATEGIES_PREFIX)){ attributesSnapshot.put(attrName, request.getAttribute(attrName)); } } } request.setAttribute(WEB_APPLICATION_CONTEXT_ATTRIBUTE, getWebApplicationContext()); request.setAttribute(LOCALE_RESOLVER_ATTRIBUTE, this .localeResolver); request.setAttribute(THEME_RESOLVER_ATTRIBUTE, this .themeResolver); request.setAttribute(THEME_SOURCE_ATTRIBUTE, getThemeSource()); FlashMap inputFlashMap = this .flashMapManager.retrieveAndUpdate(request, response); if (inputFlashMap != null ) { request.setAttribute(INPUT_FLASH_MAP_ATTRIBUTE, Collections.unmodifiableMap(inputFlashMap)); } request.setAttribute(OUTPUT_FLASH_MAP_ATTRIBUTE, new FlashMap()); request.setAttribute(FLASH_MAP_MANAGER_ATTRIBUTE, this .flashMapManager); try { doDispatch(request, response); }finally { if (!WebAsyncUtils.getAsyncManager(request).isConcurrentHandlingStarted()) { if (attributesSnapshot != null ) { restoreAttributesAfterInclude(request, attributesSnapshot); } } } }
doDispatch() 方法:
1
2
3
4
5
6
7
8
9
10
11
12
13
14
15
16
17
18
19
20
21
22
23
24
25
26
27
28
29
30
31
32
33
34
35
36
37
38
39
40
41
42
43
44
45
46
47
48
49
50
51
52
53
54
55
56
57
58
59
60
61
62
63
64
65
66
67
68
69
70
71
72
73
74
75
76
77
78
79
protected void doDispatch (HttpServletRequest request, HttpServletResponse response) throws Exception HttpServletRequest processedRequest = request; HandlerExecutionChain mappedHandler = null ; boolean multipartRequestParsed = false ; WebAsyncManager asyncManager = WebAsyncUtils.getAsyncManager(request); try { ModelAndView mv = null ; Exception dispatchException = null ; try { processedRequest = checkMultipart(request); multipartRequestParsed = (processedRequest != request); mappedHandler = getHandler(processedRequest); if (mappedHandler == null || mappedHandler.getHandler() == null ) { noHandlerFound(processedRequest, response); return ; } HandlerAdapter ha = getHandlerAdapter(mappedHandler.getHandler()); String method = request.getMethod(); boolean isGet = "GET" .equals(method); if (isGet || "HEAD" .equals(method)) { long lastModified = ha.getLastModified(request, mappedHandler.getHandler()); if (logger.isDebugEnabled()) { logger.debug("Last-Modified value for [" + getRequestUri(request) + "] is: " + lastModified); } if (new ServletWebRequest(request, response).checkNotModified(lastModified) && isGet) { return ; } } if (!mappedHandler.applyPreHandle(processedRequest, response)) { return ; } mv = ha.handle(processedRequest, response, mappedHandler.getHandler()); if (asyncManager.isConcurrentHandlingStarted()) { return ; } applyDefaultViewName(processedRequest, mv); mappedHandler.applyPostHandle(processedRequest, response, mv); }catch (Exception ex) { dispatchException = ex; }catch (Throwable err) { dispatchException = new NestedServletException("Handler dispatch failed" , err); } processDispatchResult(processedRequest, response, mappedHandler, mv, dispatchException); }catch (Exception ex) { triggerAfterCompletion(processedRequest, response, mappedHandler, ex); }catch (Throwable err) { triggerAfterCompletion(processedRequest, response, mappedHandler, new NestedServletException("Handler processing failed" , err)); }finally { if (asyncManager.isConcurrentHandlingStarted()) { if (mappedHandler != null ) { mappedHandler.applyAfterConcurrentHandlingStarted(processedRequest, response); } }else { if (multipartRequestParsed) { cleanupMultipart(processedRequest); } } } }
Handler,HandlerMapping,HandlerAdapter 三个区别:
Handler:处理器,对应 MVC 的 C层,也就是 Controller 层,具体表现形式有很多种,可以是类,方法,它的类型是 Object,只要可以处理实际请求就可以是 Handler。
HandlerMapping:用来查找 Handler 的。
HandlerAdapter :Handler 适配器,
另外 View 和 ViewResolver 的原理与 Handler 和 HandlerMapping 的原理类似。
小结 本章分析了 Spring MVC 的请求处理的过程。